When I was a teenager in the 1970s, constructing electronic projects could be frustrating. The once-common full line radio parts shops had closed and with them went the easiest sources of parts for the radio devices I wanted to build. It didn't help that the books and magazines I was reading were filled with projects built with 1950's and 60's parts. The only parts store left open, Radio Shack, had only a limited selection of modern items.
Nearly every electronic construction article mentioned that some of the parts would be found in the reader's "junk box". This rather mysterious box, not unlike Pandora's, held the important stuff needed for the project. Self-reliance is a great thing -- but as a beginner without a well-stocked "junk-box" most of my building plans were dead in the water.
My secret dream has been that one day I would be able to build complete projects without the hassle and delay of buying parts. To combat this frustration, over the years I've tended to collect inexpensive parts and equipment from hamfests, auctions, estate sales, and the like, organizing them for future use. I haven't been a maniac about it; cross-country moves, forays into other hobbies, and the growth of our family have limited the size of my "junk-box" (I wonder if my wife would agree that I've "limited" my collecting?). To keep the cost reasonable I focused my efforts on older parts. Along the way I've put my stock to good use as I repaired and restored classic radio gear, but I continued to find that I still needed to order parts to build anything from scratch. Would the day ever come that I could get an idea and just build it?
A couple weeks ago some friends and I were swapping email messages about building some very simple CW transmitters from 2N2222 transistors. I'm known for my love of vintage radio gear, so I felt obliged to jokingly reply that I should build an equivalent tube rig just to be different. Then I felt the tingle, the itch... I started to look back over my books and magazines... I found myself lingering in the garage staring at my "junk" collection... Could I do it? Had I finally reached the point where I could fulfill my "secret dream"? Could I design and build a tube rig using parts already on hand?
The first task was to design a simple, effective CW rig using vintage parts. My research sources for the project included the...
1962 RCA TT-5 Transmitting Tube Manual
ARRL "Handbooks" of 1945, '50, '59, '66, and 1975
Radio Magazine/Editors and Engineers Radio Handbooks from 1938 - 1975
ARRL's 1971 "Understanding Amateur Radio".
The latter is one of my most cherished books on ham radio. When I was starting out as a Novice I read "Understanding Amateur Radio" over and over -- it's great.
In keeping with the goals of simplicity and nostalgia, I envisioned a transmitter such as a beginner would have built in the mid-to-late 1950's. As I perused the journals this idea gelled into a design based on an electron-coupled Colpitts crystal oscillator using a 6AG7 metal tube and a dual-807 power amplifier. The only semi-modern feature would be a pi-network as the PA tank circuit (see schematic).
Bandswitching was considered -- and rejected. The prototype would be built for 40 meters and if successful, plug-in oscillator coils and the movable tap on the PA tank coil could be used later to allow band changes.
Cathode keying is one of the simplest ways to put some intelligence on the carrier, so it seemed the logical choice for this design.
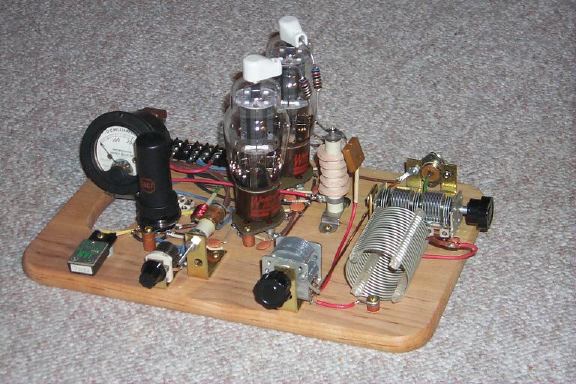
My choice of chassis was a major turning point in the project. I'd selected a metal chassis and a very professional-looking instrument case from the garage when I realized I would be hiding the best parts of the rig inside a relatively featureless cabinet. Why not build it out in the open on a wooden breadboard? That was, after all, a common construction technique for simple, beginner's tube transmitters. I changed gears, put the metal chassis and case away, and went up to the kitchen. There I found a 8.5" x 13" wooden breadboard with nicely turned edges. It was ready-made for the task -- absolutely no further cutting or sanding was needed.
Building the rig on a breadboard made a lot of sense in this application. It gave me an excuse to use the components that have the sexy vintage radio "look" such as cloth-covered wire, copper buss bars, transmitting caps, and the like. The elegant shape and polished glass of the Canadian-Westinghouse 807s would really catch the eye.
Putting artistic concerns aside for the moment, it is important to realize there are serious safety drawbacks to this construction method. The finished product is intrinsically hazardous, with high voltage and RF exposed right out in the open. This won't stop a real ham who is aware of the risks and treats the equipment with due respect, but for an appliance-operator, or even a serious ham who is only familiar with solid-state projects, this could probably result in serious bodily harm. Visitors to the shack have to be kept away from it as well ("Oooh, that's pretty" ZZZZAPPP!).
Due respect means that the operator of breadboard equipment must be ever-mindful of electrical safety. The medium and high DC voltages in this rig can cause death under the right (wrong?) conditions, and the radio-frequency voltages on the final stage and output can cause painful burns.
Follow these rules to minimize the chance of shock:
� Lay out the circuit so live conductors do not extend beyond the edge of the breadboard.
� Use insulated wire and spaghetti tubing to minimize points with exposed voltage.
� Don't work on the equipment when tired or angry.
� Turn off the power supply EVERY time a circuit change is needed.
� Turn off and unplug the power supply if the equipment is to be left unattended.
� Keep children, pets, Section Managers, and other simple folk clear of the energized rig.
� When testing and adjusting the operating transmitter keep one hand in a pocket.
This final rule provides some back-up protection - in case of accidental contact with the circuit the possibility of heart-stopping current flow across the chest is reduced.
Construction used normal hand tools. Bright-brass wood screws mounted the parts to the board. Polished brass L-brackets held the variable capacitors and antenna connector, and screws/spacers mounted the tube sockets. I found the older, flat-plate-style sockets were better for this application. An FT-243 crystal socket was placed along the front edge of the board for quick frequency changes without getting my fingers near the "live wires". (see Photos)
My L2 coil is a section of junk Airdux or B&W coil stock that I can tap with a clip as needed - as you go higher in the bands less coil is needed so the clip shorts out more turns. You know you've found the right tap point when the transmitter loads to roughly the right value of plate current, say 180 ma, with a nice sharp dip when you adjust the plate tuning cap (the one on the left of the pi network) and you are getting the expected wattage out. As an example, my L2 is 2-1/4" long and 1-7/8" diameter, has 18 turns total (8 turns per inch), and on 40m the last two turns are shorted out by the clip.
L1 is a slug-tuned coil from my junkbox... Using a grid-dip meter, I just tried various coils from my collection in parallel with the 50 pF variable cap and checked for resonance in the 40m band. Let's see... the 50 pF cap has a reactance of about 450 ohms at 7 MHz, so to be resonant the coil will have the same reactance. Working backwards 450/6.28x7= about 10 microhenries. But I say make them both adjustable and tune for max drive to the finals!
For convenience I used one of my all-purpose Heath HP-23 power supplies under the operating desk to provide the necessary voltages -- but with only three voltages required a dedicated power supply could be fashioned without too much effort.
The initial "test firings" were conducted into a 100-watt light bulb with one hand in my pocket. It worked! The PA was stable, showing no tendency to take-off, and the oscillator ran loud and proud and did not stall under any condition of tuning. Listening on a nearby receiver I discovered key-clicks were not a problem, and while I could hear some chirp it was not as bad as some commercial designs. And it was much better than most homebrew solid-state rigs of similar simple design.
I noticed the greatest shift in the oscillator frequency coincided with the PA tuning and loading adjusted for peak output. This indicated that the chirp was due more to the power supply voltage sagging a bit at full power than the changing load on the oscillator. Switching to a well-regulated low B+ supply for the oscillator took care of that problem. Perhaps one day I'll add a colorful gas-regulator tube to the rig. For now, the stability is quite good for such a simple design.
The brightness of the lamp indicated I was getting significant power out. Moving the output to a wattmeter and a 50 ohm dummy load revealed it was making about 85 watts out at the optimum settings for both signal quality and quantity. The scope showed a smooth waveform low in harmonic energy.
The first on-air test was a snap. I tuned around the low end of 40 and heard a strapping signal calling CQ within a kilocycle or so of one of my crystals, so I gave him a call. Unlike my previous homebrew transmitters (all QRP) this transmitter has some significant RF output, so unless the other op was using a brick for a receiver I should be heard. And since Paul, K2OFM, was using a fine old National receiver, he copied me 599. The QSO was all the more special when I learned that Paul was also running a homebrew transmitter: a solid-state/tube hybrid. How appropriate!
Constructing this transmitter from scratch using parts on hand has given me more satisfaction than any hobby project in recent memory. My "secret dream" has been fulfilled.
-end-
-----SIDEBAR-----
Sources of Classic Parts:
HF crystals in FT-243 holders can be a challenge to locate. Many show up at hamfests, but few are on useful amateur frequencies! I'm aware of two places to buy new, cut-to-your-frequency, FT-243 crystals:
JAN Crystals, PO Box 60017, Fort Myers, FL 33906-6017, (800) 526-9825.
PR Crystals, 2735 Avenue A, Council Bluffs, IA 51501, (712) 323-7539.
I many hams today bemoan the trouble of locating vacuum tubes, but in some respects it has never been easier to find the once-common varieties of tubes. In recent years a number of excellent mail order tube dealers have come forward. Examples include...
Electron Tube Enterprises, PO Box 8311, Essex, VT 05451-8311 (802) 879-1844. http://members.aol.com/etetubes/
ERSC, 1599 SW 30th Ave., Unit 4, Boynton Beach, FL 33426, (561) 737-8044. http://home.att.net/~esrc/esrcmain.html
Radio Electric Supply, PO Box 1939, Melrose FL 32666 (352) 475-1950. http://www.vacuumtubes.net/npage/indexc.html
For tubes, sockets, variable caps, connectors and many, many other classic electronic components, resources include...
Antique Electronic Supply, 6221 S Maple Ave, Tempe, AZ 85283 (480) 820-5411. http://www.tubesandmore.com/
Dan's Small Parts and Kits, PO Box 3634, Missoula, MT 59806-3634 (406) 258-2782. http://www.fix.net/dans.html
Ocean State Electronics (800) 866-6626. http://www.oceanstateelectronics.com/
Fair Radio Sales, PO Box 1105, Lima, OH 45802 (419) 227-6573. http://www.fairradio.com